Introduction:
Struggling with your mountain bike’s hydraulic disc brakes? You’re not alone. Whether you’re a seasoned rider or just getting started, mastering the art of brake maintenance is essential for a safe and enjoyable ride. In this comprehensive guide, we’ll delve into the nitty-gritty of how to fix mountain bike hydraulic disc brakes, providing you with step-by-step instructions and expert tips to ensure your brakes are in top-notch condition. From troubleshooting common issues to performing routine maintenance, buckle up as we explore the ins and outs of keeping your brakes in peak performance.
Understanding Hydraulic Disc Brakes:
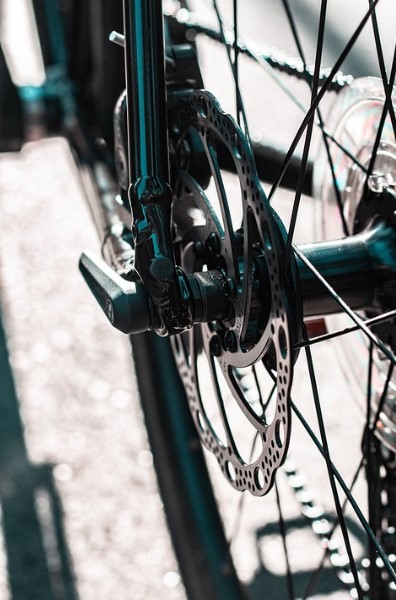
Hydraulic disc brakes are intricate systems comprising several crucial components. The brake lever, usually mounted on the handlebars, houses the master cylinder responsible for initiating braking action. Connected to the lever via a hose, the brake caliper contains pistons that apply pressure to the brake pads when engaged. These pads, in turn, clamp onto the rotor—a metal disc attached to the wheel hub—creating friction and decelerating the bike.
Diagnosing Common Problems:
1. Spongy or Soft Brake Lever:
A spongy or soft feel in the brake lever often indicates the presence of air bubbles within the hydraulic system. Bleeding the brakes—flushing out air and replenishing with fresh brake fluid—typically resolves this issue
2. Brakes Not Engaging Properly:
If the brakes fail to engage adequately, several factors may be at play, including worn brake pads, misaligned calipers, or insufficient hydraulic pressure. Careful inspection and adjustment of these components can restore proper braking performance.
3. Brake Rubbing:
Brake rubbing occurs when the pads intermittently make contact with the rotor, resulting in unwanted friction and noise. This issue commonly arises from misaligned calipers, contaminated pads, or bent rotors and necessitates realignment or replacement of affected parts.
4. Loss of Braking Power:
Diminished braking power may stem from worn brake pads, contaminated brake fluid, or damaged rotors. Addressing these issues promptly through pad replacement, bleeding the brakes, or rotor truing can restore optimal braking performance.
5. Noisy Brakes:
Squealing or squeaking noises during braking may indicate contaminated pads or rotors. Cleaning or replacing affected components and ensuring proper alignment can mitigate noise and restore smooth braking operation.
6. Brake Fluid Leaks:
Brake fluid leaks compromise braking effectiveness and pose a safety hazard. Identifying and repairing leaks promptly, often by replacing damaged seals or hoses, is crucial to maintaining a reliable braking system.
Tools and Materials Needed:
Before embarking on brake maintenance or repair tasks, gather the following tools and materials:
– Allen keys
– Torx keys
– Brake fluid compatible with your brake system
– Replacement brake pads
– Clean rags or towels
– Brake cleaner (optional)

Step-by-Step Guide to Fixing Hydraulic Disc Brakes:
1. Bleeding the Brakes:
Begin by removing the wheel to access the brake caliper.
Top up the brake fluid reservoir with the appropriate fluid.
Follow the manufacturer’s instructions for bleeding the brakes, ensuring all air bubbles are purged from the system.
Test the brakes and adjust lever feel and engagement as necessary.
2. Adjusting Brake Calipers:
Align the calipers to ensure uniform pad-to-rotor contact.
Check the brake pads for proper alignment and wear, adjusting or replacing them as needed.
3. Checking and Replacing Brake Pads:
Inspect the brake pads for wear and contamination, replacing them if necessary.
Follow the manufacturer’s guidelines for pad replacement, ensuring proper installation and bedding-in procedures.
4. Checking Brake Rotors
Inspect the brake rotors for signs of warping or damage, replacing them if necessary.
Clean the rotors thoroughly and ensure they are securely mounted within the caliper.
Preventive Maintenance Tips:
To prolong the lifespan and performance of your hydraulic disc brakes, adhere to these preventive maintenance guidelines:
– Conduct regular visual inspections of your brakes for signs of wear, damage, or fluid leaks.
– Keep the brake system clean by periodically wiping down the calipers, rotors, and brake pads to remove dirt, debris, and contaminants.
– Use only the recommended type of brake fluid specified by the brake manufacturer, avoiding mixing different fluid types.
– Store and transport your bike in a manner that minimizes exposure to moisture, extreme temperatures, and physical impacts, which can compromise brake performance and integrity.

Conclusion:
Maintaining hydraulic disc brakes is a critical aspect of mountain bike ownership, ensuring optimal performance, reliability, and safety on every ride. By understanding the components and operation of these braking systems, identifying common issues, and following the comprehensive troubleshooting and repair procedures outlined in this guide, riders can confidently tackle brake-related challenges and enjoy uninterrupted adventures on the trails. Remember, proactive maintenance and timely intervention are key to preserving the functionality and longevity of your bike’s hydraulic disc brakes, enhancing your overall riding experience and peace of mind.
FAQ
1. How do I diagnose hydraulic disc brake issues?
To diagnose hydraulic disc brake issues, start by checking for any leaks in the brake system. Inspect the brake lines, calipers, and master cylinder for any signs of fluid leakage, such as wet spots or stains. Next, examine the brake pads for wear and tear. If the pads are worn down or contaminated, they may need replacement. Additionally, listen for any unusual noises when applying the brakes, as this could indicate issues with the caliper or rotor. Finally, test the brake lever for any sponginess or lack of resistance, which could suggest air in the brake lines or a problem with the master cylinder.
– Check for fluid leaks in the brake system
– Inspect brake pads for wear and contamination
– Listen for unusual noises when applying brakes
2. How do I bleed hydraulic disc brakes?
Bleeding hydraulic disc brakes is a crucial maintenance task to ensure optimal brake performance. To bleed the brakes, you will need a bleed kit specific to your brake system, which typically includes a syringe, tubing, and brake fluid. Start by removing the wheel and brake pads to access the caliper. Attach the syringe to the bleed port on the caliper and fill it with brake fluid. Then, open the bleed valve on the caliper and slowly depress the brake lever to push air bubbles out of the system. Repeat this process until there are no more air bubbles present in the brake fluid. Finally, close the bleed valve, remove the syringe, and reinstall the brake pads and wheel.
– Use a bleed kit specific to your brake system
– Attach syringe to the bleed port on the caliper
– Repeat the bleeding process until no air bubbles are present
3. How do I replace brake pads on hydraulic disc brakes?
Replacing brake pads on hydraulic disc brakes is a straightforward process. Start by removing the wheel to access the brake caliper. Depending on the design of your caliper, you may need to remove retaining pins or bolts to access the brake pads. Once the pads are accessible, use a flat-head screwdriver or brake pad spreader tool to push the pistons back into the caliper to create enough space for the new pads. Then, remove the old pads and insert the new ones, making sure they are properly aligned with the rotor. Reinstall any retaining pins or bolts, and then reinstall the wheel.
– Remove the wheel to access the brake caliper
– Push the pistons back into the caliper to create space for new pads
– Ensure proper alignment of new pads with the rotor
4. How do I adjust hydraulic disc brakes?
Adjusting hydraulic disc brakes may be necessary to optimize brake performance and feel. Start by inspecting the brake pads for wear and contamination, replacing them if necessary. Next, check the brake lever for any sponginess or lack of resistance, which could indicate air in the brake lines. If air is present, bleeding the brakes may be necessary. Additionally, adjust the brake lever reach to ensure it is comfortable for your hand size and riding preferences. Finally, check the caliper alignment to ensure it is centered over the rotor, making adjustments as needed.
– Inspect brake pads for wear and contamination
– Bleed brakes if air is present in the brake lines
– Adjust brake lever reach and caliper alignment as needed
5. How do I troubleshoot brake noise on hydraulic disc brakes?
Brake noise on hydraulic disc brakes can be annoying and indicate underlying issues. Start by cleaning the rotor with isopropyl alcohol to remove any contaminants that may be causing noise. Next, inspect the brake pads for wear and contamination, replacing them if necessary. If the noise persists, check the caliper alignment to ensure it is centered over the rotor. Additionally, inspect the rotor for any signs of damage, such as warping or scoring, which may require replacement. Finally, check for loose brake components, such as bolts or retaining pins, and tighten them as needed.
– Clean rotor with isopropyl alcohol to remove contaminants
– Inspect brake pads for wear and contamination
– Check caliper alignment and rotor condition

